potmux
Keyman64 add-on board -- bind additional joystick buttons to keys
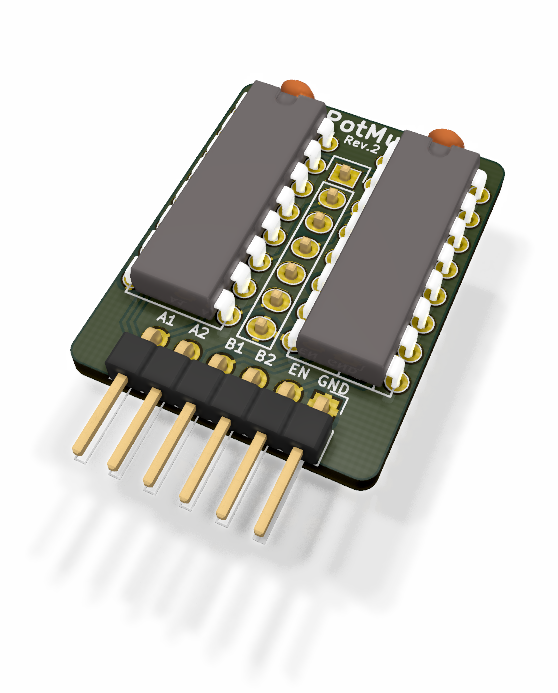
The Potmux is a small hardware add-on for the C64 that allows the user to optionally route the control port potentiometer lines to a destination other than the SID. It is mainly intended to be used with the Keyman64 for the purpose of mapping additional joystick buttons connected to the potentiometer lines to user defined keystrokes.
The potmux utility provided on this page can be used to prefix an existing C64 program with a specific potmux configuration for the Keyman64. The resulting program will first configure the Keyman64 using its serial interface connected to the tapeport lines “Cassette Sense” and “Cassette Write” and then run the original program.
Documentation is available in both english and german.
Basic Operation
The C64 uses a 4066 IC to route two of the four analog lines from the control ports (POTAX and POTAY, or POTBX and POTBY) to the two analog input lines of the SID, depending on the setting of the CIAs PA6 and PA7 line. This allows the programmer to choose which paddle pair or mouse to read from by setting the CIA lines accordingly.
This board replaces the 4066 IC and adds the ability to optionally route the four analog control port lines to an alternative destination.
When the boards enable line /EN is high, the control port lines are routed to the SID as usual, selected by PA6 and PA7.
When /EN is low, the control port lines POTAX, POTAY, POTBX and POTBY are routed to the pins A1, A2, B1 and B2 respectively.
Documentation
- Downloads
- Ordering Assembly Kits
- Assembly
- Installing the
potmuxutility - Testing
- Connecting and configuring the Keyman64
- Adding custom button configurations to programs
- License
Downloads
Source
The source distribution includes the schematics and the pcb layout in KiCad format.
Latest stable is potmux-1.0.tar.gz.
All releases can be found under /download/potmux
Latest developments are available via github:
git clone https://github.com/hbekel/potmux
Binaries
- potmux-1.0.zip (command line utility, 32bit Windows executable)
- potmux-r2-gerber.zip (gerber files for pcb production)
Ordering Assembly Kits
I’m offering assembly kits including a potmux pcb and all required components (except connection cables) for 5€ each. Worldwide shipping via regular mail is free of charge.
You can order kits via email at henning.liebenau@protonmail.com
To place an order, please include the word “potmux” in the subject. State your full name, your complete international shipping address and the number of kits you wish to buy. Note that orders are limited to a maximum of two kits per person. You will receive an email containing payment information (bank transfer only). You will have to pay in advance to confirm your order.
Notes on availability
I try to keep a sufficent number of kits on stock, but please note that I’m doing all of this in my spare time, on a short budget and a minimal profit margin. My primary motivation is to serve the community, not to run a profitable business.
This means that in case I am currently out of stock, it may take a few weeks until I can put together a new batch of kits to fullfill your order. I may even need to collect a sufficient number of prepaid orders before I can afford to order the necessary parts myself. In these cases I will regularily inform you about the status of your order. Thus some patience and trust may be required on your part.
Assembly
Please refer to the sections List of parts and Placement on board during assembly.
The board replaces U18 on 250469 and U28 on older mainboards. If not yet socketed, desolder the IC and insert a suitable socket.
Assembly Instructions
- Solder the R1 resistor on the bottom side of the board first
- Solder the capacitors C1 and C2 at the top and the 6pin angled pin header at the bottom
- Cut the supplied IC adapter strip into two strips of seven pins each
- Insert the strips into the mainboard socket (thin leads first) and position the board on the pin strips. Use the two rows of seven holes each on the board (this should be obvious).
- Solder the pin strips from the top
- Cut away the pins sticking out of the top of the board. Do this at least for the righthand adapter strip and the resistor. This allows the U2 socket to sit flat on the board.
- Solder in the IC sockets for U1 and U2
- Insert U1 and U2 into the sockets
- Insert the board into the mainboard socket
- Proceed to Testing
List of parts
| Reference | Type | Value | Package/RM |
|---|---|---|---|
| C1 | Ceramic capacitor | 100nF | 2.54mm |
| C2 | Ceramic capacitor | 100nf | 2.54mm |
| R1 | Resistor 1/4W | 4.7kΩ | 6.5mm, ∅ 2.5mm |
| U1 | 74HC4052 IC | - | DIP-16 |
| U2 | 74HC4052 IC | - | DIP-16 |
| - | Pin Header angled | 6pin | 2.54mm |
| - | IC adapter strip | 7pin | 2.54mm |
| - | IC adapter strip | 7pin | 2.54mm |
| - | Jumper bridge | - | 2.54mm |
IC sockets not listed
Placement on board

Schematics

Installing the potmux utility
Binary
The windows 32bit executable can be found in the zipfile
above. Just place the potmux.exe into a directory of your choice and
add it to your path.
Source
Linux & MacOSX
Extract the tarball and change to the source directory.
Building requires KickAssembler 4. Adjust the Makefile and make the KASM variable point to your KickAssembler installation.
Type make.
Then use make install to install the potmux binary into
/usr/local/bin. The PREFIX variable can be used to install with a
different prefix, e.g. use make PREFIX=/usr install to install into
/usr/bin instead. The DESTDIR variable can be used for a staged
install.
Testing
Verify that paddles still work as usual
If you have paddles or a mouse, verify that they are still working as usual by loading software that requires them or by using a suitable testing program.
Verify that alternative routing works
Use the supplied jumper bridge and bridge the /EN and GND pins. This can be safely done while the C64 is running.
Now that /EN is driven low, the potentiometer lines should no longer be connected to the SID, and thus paddles or mice should no longer work.
Connect your joystick(s) and verify with a multimeter that pressing the additional buttons will pull the corresponding potmux pins to GND:
| Potentiometer line | C64 Control Port | Potmux pin |
|---|---|---|
| POTAX | A | A1 |
| POTAY | A | A2 |
| POTBX | B | B1 |
| POTBY | B | B2 |
Connecting and configuring the Keyman64
Once you have tested that the device works as intended, you can now connect the /EN line of the potmux to a free control line of the Keyman64 and configure a keybinding for it. For this example, it is assumed that the potmux’s /EN line is connected to line 0 of the keyman64 control port A.
set a0
b: invert a0
We first set /EN high on powerup or after a reset of the Keyman64, so that paddles or mice will initially work when turning on the C64. We also define a keybinding on Meta-B that switches back and forth between normal and alternative routing.
Connect the output lines of the potm5Cux to the Keyman64 control lines. We’ll assume here that the potmux lines a1 through b2 are connected to the lower half of the keyman control port B.
You have to make sure that these control lines are initially tristated by the keyman64 and will never be set, cleared or otherwise modified.
Configure some mappings in the Keyman64 configuration for testing purposes. We’ll add the following commands to the configuration:
map b0 A
map b1 B
map b2 C
map b3 D
The map command maps a control port line to a key. In this case, we’re mapping the buttons a1 through b2 to the keys A through D respectively.
Upload your configuration. Make sure you are in direct mode, switch to alternative routing using Meta-B and press your additional joystick buttons. The keyman should press the configured key every time you press the corresponding button.
Adding custom button configurations to programs
You will probably want to map different keys to your buttons depending on which program or game you are currently running. But changing and uploading the keyman64 configuration every time you load a new program is not very convenient.
It would be much more convenient if the button configuration could be added to the program itself, so that it reconfigures the Keyman’s button mapping automatically before starting.
For this to work, the C64 must be connected to the Keyman64 serial interface. See the sections Serial interface and Connecting the Serial interface to the C64 in the Keyman64 documentation for details.
Once connected to the serial interface, C64 can execute serial commands on the Keyman64, which includes a map command for (re)mapping control lines to keys.
You can then use the supplied command line tool potmux to patch a C64
program file and add the desired button configuration:
This is the output of potmux --help:
Usage: potmux [<option>...] <program> [<button|switch>...]

Options:
         -h, --help           : print this help text
	 -v, --version        : print version information
         -o, --outfile <file> : output file (default: stdout)

Arguments:
         <program> : C64 program file to patch
	 <button>  : route a joystick button to a key
	 <switch>  : specify enable line and state

Example:
         potmux -o patched.prg game.prg a0:on b1:space
In the example above, the existing file game.prg is patched and the
patched version is written to the output file patched.prg. The
remainder of the line contains the configuration arguments.
The argument a0:on instructs the program to pull the keyman control
line a0 to low, assuming that this is the potmux /EN line.
The program thus automatically enables the alternative routing for us.
The argument b1:space instructs the program to map the keyman
control line b1 to the space key.
Programs that use paddles or mice can be patched to turn off the alternative routing automatically, e.g.
potmux -o patched.prg game.prg a0:off
This will make sure that paddles or mice will always work when running this program.
License
Copyright (c) 2020 Henning Liebenau <henning.liebenau@protonmail.com>

Permission is hereby granted, free of charge, to any person obtaining
a copy of this software and associated documentation files (the
"Software"), to deal in the Software without restriction, including
without limitation the rights to use, copy, modify, merge, publish,
distribute, sublicense, and/or sell copies of the Software, and to
permit persons to whom the Software is furnished to do so, subject
to the following conditions:

The above copyright notice and this permission notice shall be
included in all copies or substantial portions of the Software.

THE SOFTWARE IS PROVIDED "AS IS", WITHOUT WARRANTY OF ANY
KIND, EXPRESS OR IMPLIED, INCLUDING BUT NOT LIMITED TO THE
WARRANTIES OF MERCHANTABILITY, FITNESS FOR A PARTICULAR PURPOSE AND
NONINFRINGEMENT. IN NO EVENT SHALL THE AUTHORS OR COPYRIGHT HOLDERS
BE LIABLE FOR ANY CLAIM, DAMAGES OR OTHER LIABILITY, WHETHER IN
AN ACTION OF CONTRACT, TORT OR OTHERWISE, ARISING FROM, OUT OF OR
IN CONNECTION WITH THE SOFTWARE OR THE USE OR OTHER DEALINGS IN
THE SOFTWARE.